DIY RENUEVA TU CAMISA CON MANGAS UPDATE YOUR SHIRT


Renueva tu camisa!!
mucho tiempo, sin un DIY fácil y práctico.


 1-aplanar las mangas simétricamente
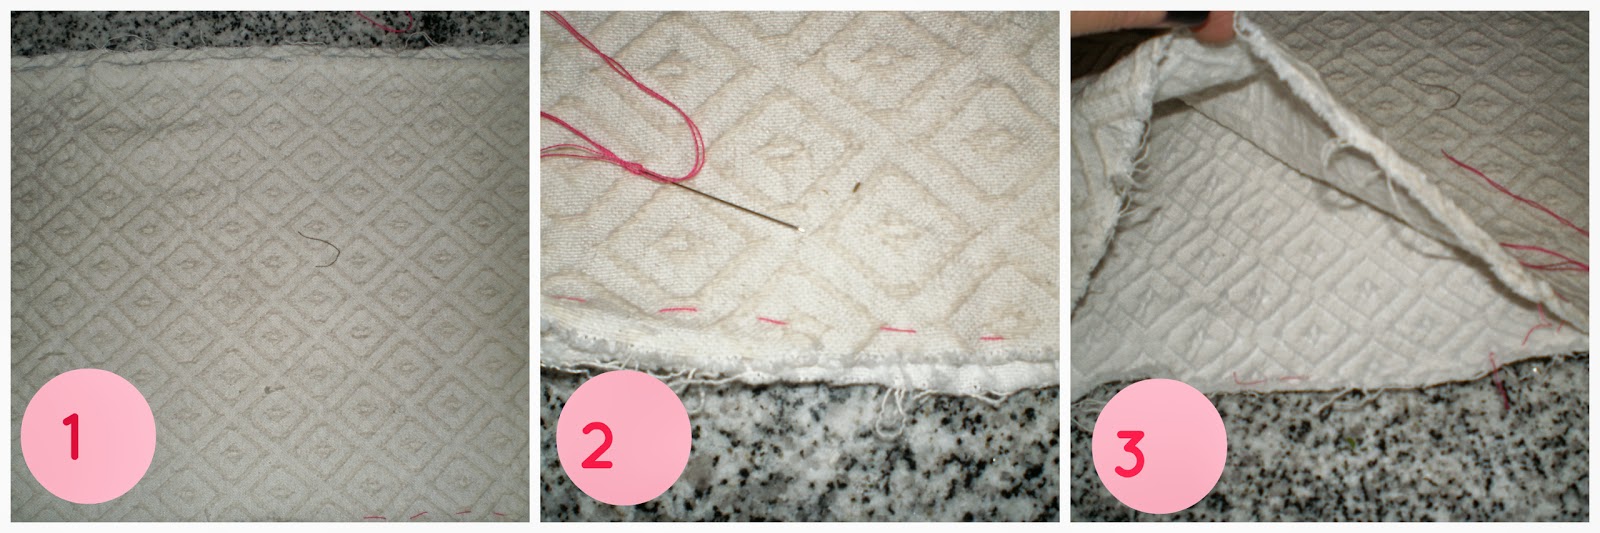
2-cortar dejando un margen de costura de 2 cms
3-enrollar en si misma, la tela, y coser del revés, con puntadas invisibles.
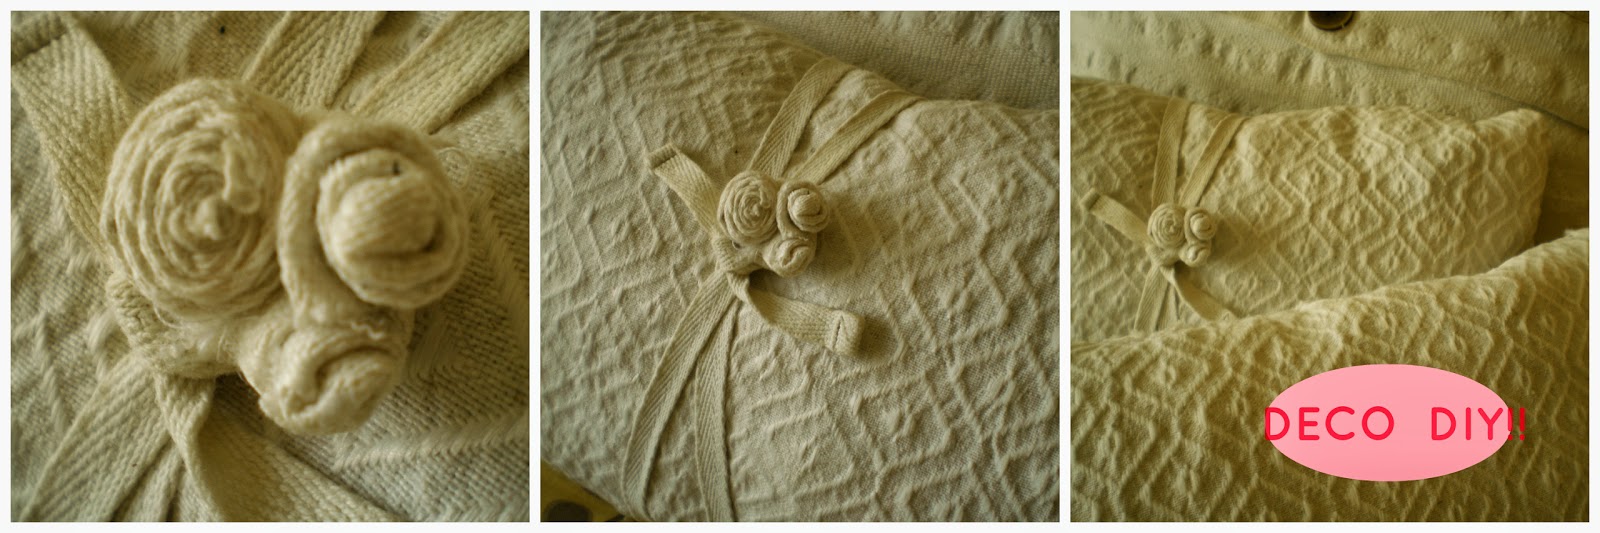
Listo!! ya tienes tu camisa sin mangas, ahora decórala a tu Gusto!!
4-agregar detalles de cintas o puntillas con algunas puntadas.


Update your shirt 
long time without easy and practical DIY. 
1-flatten the sleeves symmetrically 
2-cut leaving a seam allowance of 2cm 
3-roll itself, the fabric, and sew inside out, with invisible stitches 

4-add ribbons or lace detail with a few stitches.


DIY CAJA PARA JUGUETES WOOD DRAWER FOR TOYS

Conseguí esta caja de frutas, de madera, y se me ocurrió que arreglándola un poco, vendría muy bien para los juguetes de mi hija.
los pasos son simples:
1-lijar con lijas para madera 180-220 (grosor del grano)
2-limpiar el polvillo.
3-aplicar masilla para madera en las imperfecciones o enduído de pared, en las maderas que sean muy ásperas.
4-pintar con pintura al agua (látex) o la que prefieras.
5-para la decoración de flores, recorté una servilleta de flores y le quité las capas de papel que trae detrás, coloqué pegamento en la madera y ,  muy lentamente, pegué la estampa.
6-dejar secar, lijar para dar un acabado viejo, colocar pátinas, y un barniz protector.
7-en la base, coloqué paño lenci (felpa) para que no lastime al piso.
8-tambien puedes colcarle un cordón para que los niños lleven a pasear a sus muñecos.


 Get this box of fruit, wood, and it occurred to me that fixing it a little, would come in handy for my daughter's toys.
the steps are simple:

1-sanded with 180-220 sandpaper wood (grain thickness)
2-clean the dust.
3--applied wood putty or spackling imperfections for walls, on the woods that are very rough.
4-painted with water based paint (latex) or you prefer.
5-the flowers for the  decoration: cut out a napkin with a lovely disegn .and removed the layers of paper that brings back,  put glue on the wood and, very slowly, hit the print.
6-let dry, sanded to give an old finish, placing patinas, and a protective varnish.
7 at the base, placed lenci cloth (plush) for not hurt the floor.
8-put cord , so the children ,can take a ride with  their dolls.


DIY ADORNOS NAVIDEÑOS CON PAPEL Y CARTÓN DIY CHRISTMAS DECORATIONS WITH PAPER AND PAPERBOARD

Tan sencillo como:


1-marcar en el cartón el molde, recortar.
2-cortar el papel un poco mas grande que el molde, y realizar unos cortes para poder pegarlos.
3-coloca otro papel para tapar la otra cara del colgante.
4-agujerea  y coloca un cordón para colgar.
5-decora con brillos, palabras, papeles,perlas,telas o papeles colocados como tejas. 


As simple as:

1-dial in the mold cardboard cut out.
2-cut paper slightly larger than the mold, and make cuts to paste.
3-places another paper to cover the other side of the pendant.
4-bore and put a cord for hanging.

5-decorate with glitter, words, paper, beads, cloth or papers placed as tiles.


DIY PORTA BIJOUTERIE DIY BIJOUX HOLDER

Estás lista para organizar tus pendientes? Sólo necesitas un cuadro que ya no uses, o un marco de cuadro. Vamos, comencemos...!!
Let Get Started!!all you need is a picture frame.


1-desarmar el marco
2-cortar una tela , tipo paño lenci ,o felpa
3-colocar la tela entre el marco y la imagen del cuadro.
4-cortar las esquinas, en diagonal
5-colocar adhesivo y pegar la tela.
6-colocar, por detrás del marco, un recorte de tela para tapar y que se vea mejor.
7-colocar, si fuera necesario, un gancho para colgar.

1-disassembling the frame
2-cut fabric, cloth type lenci, or felt
3-place fabric between the frame and the image of the frame.
4-cut corners, diagonally
5-place adhesive and glue the fabric.
6-place, behind the frame, a cut of cloth to cover and make it look better.
7-position, if necessary, a hook for hanging.


DIY TEÑIR EN FRÍO-CAMBIANDO EL COLOR A UNA CAMISA CON ANILINA COLD DYE, DYEING WITH ANILINE

Teñir es tan fácil como divertido! te lo recomiendo antes de darte por vencida con alguna prenda que ya no le tengas mas esperanzas...
Antes de teñir:
  • Asegurate de que la anilina tiña el tipo de tejido que sea, rayón , algodón, seda.
  • hay telas que no se pueden teñir con anilina, las prendas o hilos de una prenda, que sean de poliéster, no se teñirán.
  • recuerda usar guantes de látex para no mancharte.
  • las cucharas o elementos que uses, los debes limpiar con lejía, lavandina o cloro, según la llames en tu país.
  • la sal, fija los colores, por lo tanto, debe estar totalmente disuelta, si hay granitos de sal, disuélvelos!
  • el vinagre, en el enjuague final, ayuda a fijar el color.
  • recuerda que si tiñes varias prendas al mismo tiempo, quedarán diferentes tonos del color.
  • siempre, lee las instrucciones del envase, ya que cada fabricante puede tener indicaciones diversas.


Dye is so easy and fun! I recommend before you give up on a garment that no longer have more hope ...
Before dyeing:
  • Make sure the aniline dye your type of fabric is, rayon, cotton, silk.
  • some fabrics which are not dyeable with aniline, clothing or a garment yarns which are polyester, are not stained.
  • remember to wear latex gloves to not get dirty.
  • spoons or items you use, you should clean the bleach, bleach or chlorine, as you call it in your country.
  • salt, fixed colors, therefore, must be completely dissolved, if grains of salt, dissolve them!
  • vinegar in the final rinse, helps set the color.
  • remember that if you dye several items at the same time will be different shades of color.
  • always read the instructions on the package, as each manufacturer may have different indications.

1-lavar la prenda, y mojarla.
2-colocar agua en un recipiente, y añadirle sal, 1 cucharada por litro de agua, disolver.
3-disolver el pigmento en agua hirviendo, y vocarlo en el agua con sal.
4-colocar la prenda y remover sin parar, para evitar una coloracion despareja
5-remover cada 5 minutos, durante 1 hora.
6-pasado el tiempo, enjuagar el resto del color y dejar secar a la sombra.
7-lavar la prenda, preferentemente con prendas de colores similares, ya que puede manchar otras prendas.


1-wash the garment, and wet it.
2-put water in a bowl, and add salt, 1 tablespoon per liter of water, dissolve.
3-dissolving the pigment in boiling water, and vocarlo in salted water.
4-place the garment and stir continuously to avoid uneven coloring
5-remover every 5 minutes for 1 hour.
Six-over time, rinse the rest of the color and let it dry in the shade.
7-wash the garment, preferably with like colors, as it can stain other garments.

DIY DECO CAJA CAJON VINTAGE DIY DECO VINTAGE BOX

La caja es completamente hecha de carton, luego se le agregan dos capas que le darán mejor aspecto y mucha resistencia.
*puedes usar la misma tecnica en recipientes de centros de mesa, canastos, falsos libros u objetos de utilería, marcos de cuadros, lo que quieras! a crear con imaginación!


1-Consigue una caja o si sabes hacer una, esta es la mejor forma de que sea a la medida de lo que necesitas, si quieres los moldes, envíame un mail a make079@gmail.com

2-corta con la mano, trozos de papel de periodico y,pégalos  con adhesivo, (del que usan los niños en la escuela), puedes hacerlo mas fluido, con un poco de agua.

3-dejar secar, y repetir este paso, tantas veces como quieras, si la caja tiene partes caladas como asas, hazlas mas fuerte con esta técnica.(yo, hice 4 veces)

4-para mejorar la textura, aplica enduido o masilla , dejar secar.

5-lijar bien, hasta que tenga apariencia de madera , bien lisa.
6-pinta o realiza una pátina, aplica imágenes, palabras o todo lo que te guste.
7-si quieres proteger la caja, puedes aplicar barniz brillante, mate o ponerle cera de pisos 


1-Get a box or if you can make one, this is the best way that is tailored to what you need, if you want the molds, send an email to make079@gmail.com

2-cut by hand, pieces of paper newspaper and glue with adhesive, ( that children use at the school), you can make it more fluid, with a little water.

3, let dry, and repeat this step as many times as you want, if the box has openwork sides as handles, make them stronger with this technique. (I, I made 4 times)

4-to improve the texture, apply spackling or putty, let dry.

5-sand well, until you have wooden appearance, smooth.

6-pint or makes a Patinated, apply images, words or anything you like.

7-if you want to protect the box, you can apply gloss varnish, matt or put wax floors.


DIY DECO ALMOHADONES COJINES DIY DECO PILLOWS CUSHION


Si tienes un trozo de tela rectangular, un poco de relleno de otro almohadón y algo de ganas de coser, ya mismo puedes empezar!


1-cortar un rectágulo de 42 cms x 26 cms 
2-coser los 3 lados y dejar un lado abierto para poder rellenar el almohadón
3-cerrar con puntadas a mano o con máquina de coser

If you have a rectangular piece of fabric, filling some other cushion and some feel like sewing you can start right now!
One-cut a rectágulo of 42 cms x 26 cms (use http://convertnation.com/)
2-sew 3 sides and leave one side open to fill the cushion
3-closed with stitches by hand or with a sewing machine
4-for the flower, fold a strip of fabric in half longitudinally
5-roll up ribbon itself, forming a spiral

6-hold the flower, with a few stitches, apply, sewing the cushion-


4-para la flor, doblar una tira de tela por la mitad longitudinal
5-enrrollar en sí misma la cinta, formando un espiral
6-sujetar la flor, con unas puntadas para que no se deshaga; aplicar cosiendo al almohadón-


 usa el conversor de medidas http://convertnation.com/

DIY CAMISETA CON APLIQUES DE MOÑOS -LAZOS DIY BOW T-SHIRT

Me han inspirado mucho las fotos de esas camisetas, y ya hacía mucho tiempo que tenía esos moños o lazos, que habían sido de unas gomas para el cabellos y me parecieron perfectos para aplicar en alguna camiseta, por fin tomé coraje y viendo que quedaban tan simpáticos me dispuse a hacer lo mismo!


  1.  elegir el lugar en donde aplicaremos el bow
  2. dar unas puntadas para fijarlo , sin que se vean en el frente de la camiseta
  3. coserlos bien para que al lavar la camiseta, no se quiten.
  1. choose the place where the bow apply
  2. give a few stitches to secure, without showing on the front of the shirt
  3. sew well so that when washing the shirt, not removed.


para hacer el moño:
  • con un rectángulo de tela (cosido del revés en sus 4 lados, dejar abierto un espacio sin coser para darlo vuelta)
  • fruncir el centro y ajustar con unas puntadas
  • si lo deseas, puedes colacar otro rectángulo cubriendo  el centro del bow


to make the bow:

  • with a rectangle of fabric (sewn upside down on 4 sides, leaving open a space unsewn to turn it around)
  • shirring the center and tighten it with stitches
  • if you want you can gently place another rectangle covering the center of the bow


Related Posts Plugin for WordPress, Blogger...