DIY PULSERAS EXPRESS - BRACELETS EASY AND FAST


DIY PULSERAS EXPRESS - BRACELETS 
EASY AND FAST


Qué se necesita:

  • elastico cilíndrico  50 cms -se usa para las gomas del cabello ( como estas, pero se consiguen por metro ,  yo compre medio metro) 
  • dijes y adornos o restos de bisutería que te gusten
  • plancha caliente o una vela encendida para quemar los extremos
 you need:

  • 50 cm cylindrical elastic-rubber is used for hair (like these, but measured in meter, I bought half a meter)
  • charms and jewelry ornaments or remnants that you like
  • hot iron or a candle to burn the extremes

  1. quemar con la plancha de ropa o pasar por el fuego los extremos para que no se deshilache.
  2. anudar, colocar adornos y si quieres puedes anudar nuevamente.
  3. unir las puntas con un nudo para finalizar.
  4. puedes realizar varios nudos para lograr otras versiones, o unir dos colores diferentes.divertirse es la idea!!

  1. burn with clothes iron, or pass through the fire, the ends to prevent fraying.
  2. tie, place ornaments and if you like you can tie again.
  3. join the ends with a knot to finish.
  4. You can make several knots to make other versions, or merge two different colors. having fun is the must!!


DIY AJUSTA TUS JEANS EN 5 MINUTOS! SKINNY JEANS

DIY AJUSTA TUS JEANS EN 5 MINUTOS!   SKINNY JEANS

  1. poner el pantalón del revés
  2. hacer una marca a la altura de la entrepierna o cadera
  3. marcar en la bota manga del pantalón el ancho que tendrá
  4. unir ambos puntos con regla, alfileres o marcando con tiza
  5. coser a mano o a máquina, y cortar el sobrante de tela
  6. planchar la costura para que se acueste y no sobresalga.


  1. put the pants inside out
  2. make a mark at the height of the groin or hip
  3. mark on the feet of the pants, the width that will have
  4. joining the two points with a ruler, pins or chalking
  5. sewing by hand or machine, and cut the excess fabric
  6. iron the seam to lie down and not stick out 

DIY PARA ALARGAR UNA CAMISA

DIY  PARA ALARGAR UNA CAMISA
A una camisa (bastante básica)le agregué una puntilla,y luego le añadí una franja de tela de algodón (como de camiseta)con unas simples puntadas el resultado queda como esperaba, ópticamente más larga, cubre un poco más y tiene un lindo detalle de puntilla.
Aquí la explico:


DIY FOR ENLARGE A SHIRT
In a shirt (very basic) I added a sprig, and then I added a strip of cotton fabric (like t shirt) with simple stitches the result is as expected, optically longer covers a little more and has a pretty detail lace.
Here I explain it:


  • Cortar una tira del tamaño del contorno de la camisa (o usar el borde de una camiseta vieja)
  • Cut a strip the size of the the contour of the shirt (or using the edge of of an old shirt)


  • alfiletear para ver cómo quedará y sostener el trabajo.
  • pinning to see how it will look, and hold the garment


  • colocar la tela (previamente cosido el borde --- yo tenía un trozo de tela que ya tenía el ruedo* listo) y la puntilla cosiendo por dentro, para que aparente ser otra prenda superpuesta
  • place fabric (previously stitched the edge --- I had a piece of fabric that already had the hem * done) along with the lace sewn on the inside, so that it seems to be another piece overlaid

*Ruedo:dobladillo-bajos-hem


  • coser con puntada invisible por detrás o con pespunte a máquina por el frente de la camisa.
  • behind sew with blind stitching, or machine stitching at the front of the shirt.


  • terminar cerrando las costuras en los extremos para que no se deshilache luego.Lista!!
  • end up closing the seams at each end for to avoid raveling at. Done!


PULSERA Y COLLAR RECICLADOS

PULSERA Y COLLAR RECICLADOS
A veces parece que nuestros accesorios tienen un final, pero hoy les daremos una oportunidad mas, usándolos en otros accesorios, pendientes viejos,cadenas o collares, no te pierdas el DIY del día!


BRACELET AND NECKLACE RECYCLED
Sometimes it seems that our accessories come to an end, but today I will give one more chance, using them in other accessories, old earrings, chains or necklaces, do not miss the DIY of the day!


    cortar la cadena o collar 
  • corta la cadena a la medida de tu muñeca o si lo prefieres, puedes cortarla mas grande para pasarla 2 veces
  • cut the chain to fit your wrist or if you prefer, you can cut larger to pass it 2 times


cierre para mi pulsera

  • colocarle en un extremo un cierre para bijouterie, yo elegí uno tipo marinero o para llaveros
  • Si el collar, ya trae cierre, MEJOR!


  • put at one end a closure for Jewellery, I chose one type sailor or keychains
  • If collar, has closure BETTER!


  • abrir los pendientes y retirar la parte que va en el lóbulo, y engancharlo al collar


  • puedes usar tu pinza de depilar o tijera o también puedes usar las herramientos de tu chico!
  • open earrings and remove the part that goes in the lobe, and hook it to the collar

  • you can use your scissors tweezers or you can also use your boyfriend`s tools!

  • Usa pendientes pasados de moda, flecos,piedritas,argollitas,o cualquier dije o colgante  que encuentres por allí
  • Use old-fashioned earrings, fringe, stones, rings, or any pendant you find out there


  • Para renovar este collar, usé un pendiente que su par estaba perdido, y como traía un orificio, lo pude enganchar a la cadena sin problemas, ahora es un collar de Luna
  • To renew this necklace, I used an earring that his pair was lost, and as has an orifice, I could hook the chain smoothly, it is now a moon necklace


RENUEVA TU BOLSO BANDOLERA CON ANIMAL PRINT!

RENUEVA TU BOLSO BANDOLERA CON ANIMAL PRINT!


Este DIY es muy sencillo, con un portacométicos que estaba sin uso y un poco roto, tomé una parte y se la añadí a un bolso para darle un toque mas moderno,en 5 minutos, puedes tener una pieza de moda y reciclando algo que ya no usas. te lo cuento en fotos.


RENEW YOUR SHOULDER BAG WITH ANIMAL PRINT!

This DIY is very simple with cosmetic holder was never worn and slightly torn.
I took part and added it to a bag to give a touch more modern, in 5 minutes, you can have one piece of fashion and recycling something you no longer use. I'll tell you in photos.


  1. cortar del viejo bolso o porta cosméticos la cantidad y la medida que deseemos pegar en el nuevo bolso reciclado
1. cut the old purse or cosmetic carrier and measure the quantity we want to paste in the new recycled bag


porta cosméticos que no se use más
 2. medir bien para ajustar a la medida correcta
2.measure well, to adjust to the right size

recortar la medida mas aproximada a la del bolso
  3. pegar con pegamento de contacto para telas o cuero sintéticos
  3.paste with contact adhesive fabric or synthetic leather


adhesivar con pegamento de contacto según indique el envase
 4. presionar fuertemente para fijar las 2 partes

4.Press firmly to attach the 2 parts


presionar un momento para fijar la tela

5  .en el caso de este bolso, el cierre que tenía era de velcro, (QUÉ ES?) asi que solo restaba volverlo a pegar.
5.In the case of this bag, the closure it was Velcro (WHAT IS IT VELCRO ?) 
 just Remained re-cemented.
colocar velcro 
6. hacerlo coincidir con el velcro de la tapa, y LISTO!  

***agrega mas detalles como flecos, tachas o cadenas!***

to match the velcro cover, and READY!

*** add more details like tassels, studs or chains! ***


con un rectángulo sobrante realicé moños y se los apliqué a los zapatos

mira mas con animal print aquí

See more animal print here


TEÑIR CON TÉ

TEÑIR CON TÉ

Viendo que se usa mucho el color Nude, me pareció práctico, ya que a la madrugada no podría conseguir anilinas, teñir con té...nunca lo había hecho, pero me pareció genial probarlo.-


en 3 simples pasos te explico cómo hacerlo:


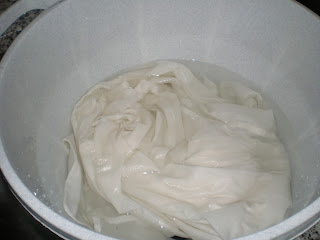
1- lavar y remojar en agua la prenda a teñir, asi el teñido es parejo

2-colocar un poco de agua con sal disuelta, en un recipiente donde la camisa quepa cómodamente agregarle la preparación de un té con uno o varios saquitos de té, dependiendo la intensidad del color que deseemos
3-mover la prenda para un teñido parejo, y al cabo de 30 min aprox enjuaguar rápidamente con agua el exceso de color que pueda quedar, si el agua sale sin color será suficiente, la prenda habrá tomado el tinte que necesitaba.- 

remojar la prenda antes para eliminar restos de jabón

preparar el té, pero no tomarlo!!

remover un buen rato, la prenda va tomando color!!


Stained with TEA

Seeing that is widely used the nude color, it seemed convenient as the morning could not get anilines, dyed with tea ... never had, but I felt great try. -

in 3 simple steps will explain how to do it:

1 - Wash and soak the garment in water to dye and dyeing is even
2-put a little water with salt dissolved in a container where the shirt fits comfortably add tea preparation with one or more tea bags, depending on the intensity of the color we want
3-move the garment dyeing even, and after about 30 minutes Rinse immediately with water color excess can be, if water comes out without color, will suffice, the clothes will have taken the dye needed. -


La camisa era blanca, y en el DIY le cambié el color, a uno mas otoñal , también le agregué unas tachas color bronce viejo, creo que le voy a cortar un poco el largo...pero me gusta, pronto agregaré algun look con ella
The shirt was white, and the DIY I changed the color to a more autumnal, also I added some old brass tacks, I think I'll cut a little long ... but I like it. soon will add some look using it.


http://estiladiy.blogspot.com.ar/http://estiladiy.blogspot.com.ar/

CUSTOMIZA AROS (PENDIENTES) EN 3 MINUTOS!

CUSTOMIZA AROS (PENDIENTES) EN 3 MINUTOS!
Como se ve en la foto, los pendientes eran planos, y la verdad, no me convencían mucho...
Solamente, coloqué la pinza en la mitad de cada aro, y presioné desde los laterales, hacia abajo, presionando ligeramente, hasta darle curvatura a gusto de cada una, incluso, se podrían doblar tanto que queden la mitad de lo que son, va en gustos...

aros planos

colocar la pinza en la mitad y presionar desde los laterales hacia abajo


así quedan, mas curvos


Related Posts Plugin for WordPress, Blogger...