DIY : VELAS ( A PARTIR DE OTRAS VELAS)

Esta es mi forma de hacer velas, hay tantas variantes de elementos y técnicas como de tamaños y formas existen.
la idea, es que siempre, puedes, fundir las velas que se han derretido, mezlcar sus colores y darle vida a una nueva.

MATERIALES:

  • alambre dúctil, dulce, semi flexible o como le llames. 20 CMS O MENOS
  • hilo de algodón , el de las pizzas
  • aceite neutro, de cocina, de bebé, vaselina, etc ( lo que tengas)
  • recipientes para usar de moldes (tazas, vasitos, moldes de bombones)
  • velas viejas o parafina sólida
  • crayones o colorantes para velas.
  • una lata de conservas o jarro para derretir la cera.
  • papel de cocina
  1.  cortar parafina u otras velas viejas.
  2. derretirlas a baño maría ( usa una lata de conserva )
  3. una vez derretida la cera, sumerge el hilo 2 o 3 veces, y dejalo que seque extendido en la mesa.
  4. aceitar los moldes con el papel y el aceite.


  1. colocar la parafina caliente en los moldes y no moverlos.
  2. dejarlos enfriar bien
  3. desmoldar las velas con cuidado
  4. calentar el alambre en el fuego o con un mechero y hacer un orificio de lado a lado por el centro de la vela.
  5. pasar el hijo por el orificio y anudar por debajo de la vela.
  6. lavar si es necesario, las velas con agua y detergente de cocina para retirar el aceite.
** los crayones, puedes agregarlos en la parafina caliente, y colorearla, puedes agregar poco a poco, para ir viendo si el color  es el que te gusta**


DIY: CINTURÓN NUEVO - NEW BELT

Con viejas correas o tiras de un bolso, que ya no uses, puedes transformarlo en un nuevo cinturón.
1-desarmar y descoser toda la tira.
2-enhebrar la hebilla y coser a mano (también puedes mandar a remendar a un zapatero)
3-realizar agujeros equidistantes, con sacabocado o con algun elemento punzante.
4-cerrar el otro extremo del cinturón con puntadas o algúna tela decorativa.

Listo!! tu nuevo cinturón en pocos minutos!
With old belts or straps of a bag, you no longer use, you can transform it into a new belt. 
1-disarm and unpick the entire strip. 
2-thread the buckle and hand sewing (you can also send a cobbler mending) 
3-make equidistant holes with punch or any sharp object. 
4-close the other end of the belt with some decorative stitches or fabric. 

Ready !! your new belt in a few minutes!

DIY: RENUEVA TU COLLAR - RENEW YOUR NECKLACE


1-anuda la hebra de hilo, y comienza a enrollarlo alrededor del collar
2-enrolla en hilo tantas veces como desees, puedes usar hilo de bordar o varias hebras de hilo de coser.
3-asegura el hilo, con una gota de pegamento.


1-knotting yarn strand, and starts rolling it around the necklace
2-thread rolled in as many times as you want, you can use embroidery floss or more strands of thread. 
3-ensures the thread, with a drop of glue.

DIY: CABECERA DE CAMA PINTADA A RAYAS - PAINTED HEADBOARD

*Mi cabecera mide 1,60 mts y realicé 10 franjas cada 16 cms.


1-cortar un rectángulo o cuadrado para la cabecera de la cama, con las medidas que querramos.
2-limpiar la superficie y sabiendo el ancho de la madera, marcar las que serán las futuras rayas( suavemente con lápiz o con algunos puntos)
3-puedes pintar toda la madera del color más claro y luego, pintar las franjas del otro color.
4-colocar cinta de pintor o de enmascarar, por las marcas que hemos hecho.
5-pintar con latex o pintura sintética y de inmediato retirar las cintas.
6-aplicar barniz en aerosol o el que prefieras.
7-coloca soportes por detrás,  para colgar la cabecera y tornillos o algún perno para  colgarla.


My headboard´s measure is     5 feet and 2.9 inches , I made 10 stripes each  6.29 inches  
1-Cut a rectangle or square to the bedside, and the actions we want. 
2-clean the surface and knowing the width of the timber, which will mark the future stripes (lightly in pencil or some points) 
3-can paint all the wood of lighter color and then paint the stripes of a different color. 
4-place painter's tape or masking, by the brands that we have done. 
5-painting with latex or synthetic paint and remove the tape immediately. 
6-applied spray varnish or you prefer. 

7-placed behind stands, hanging the head and a bolt or screw to hang.


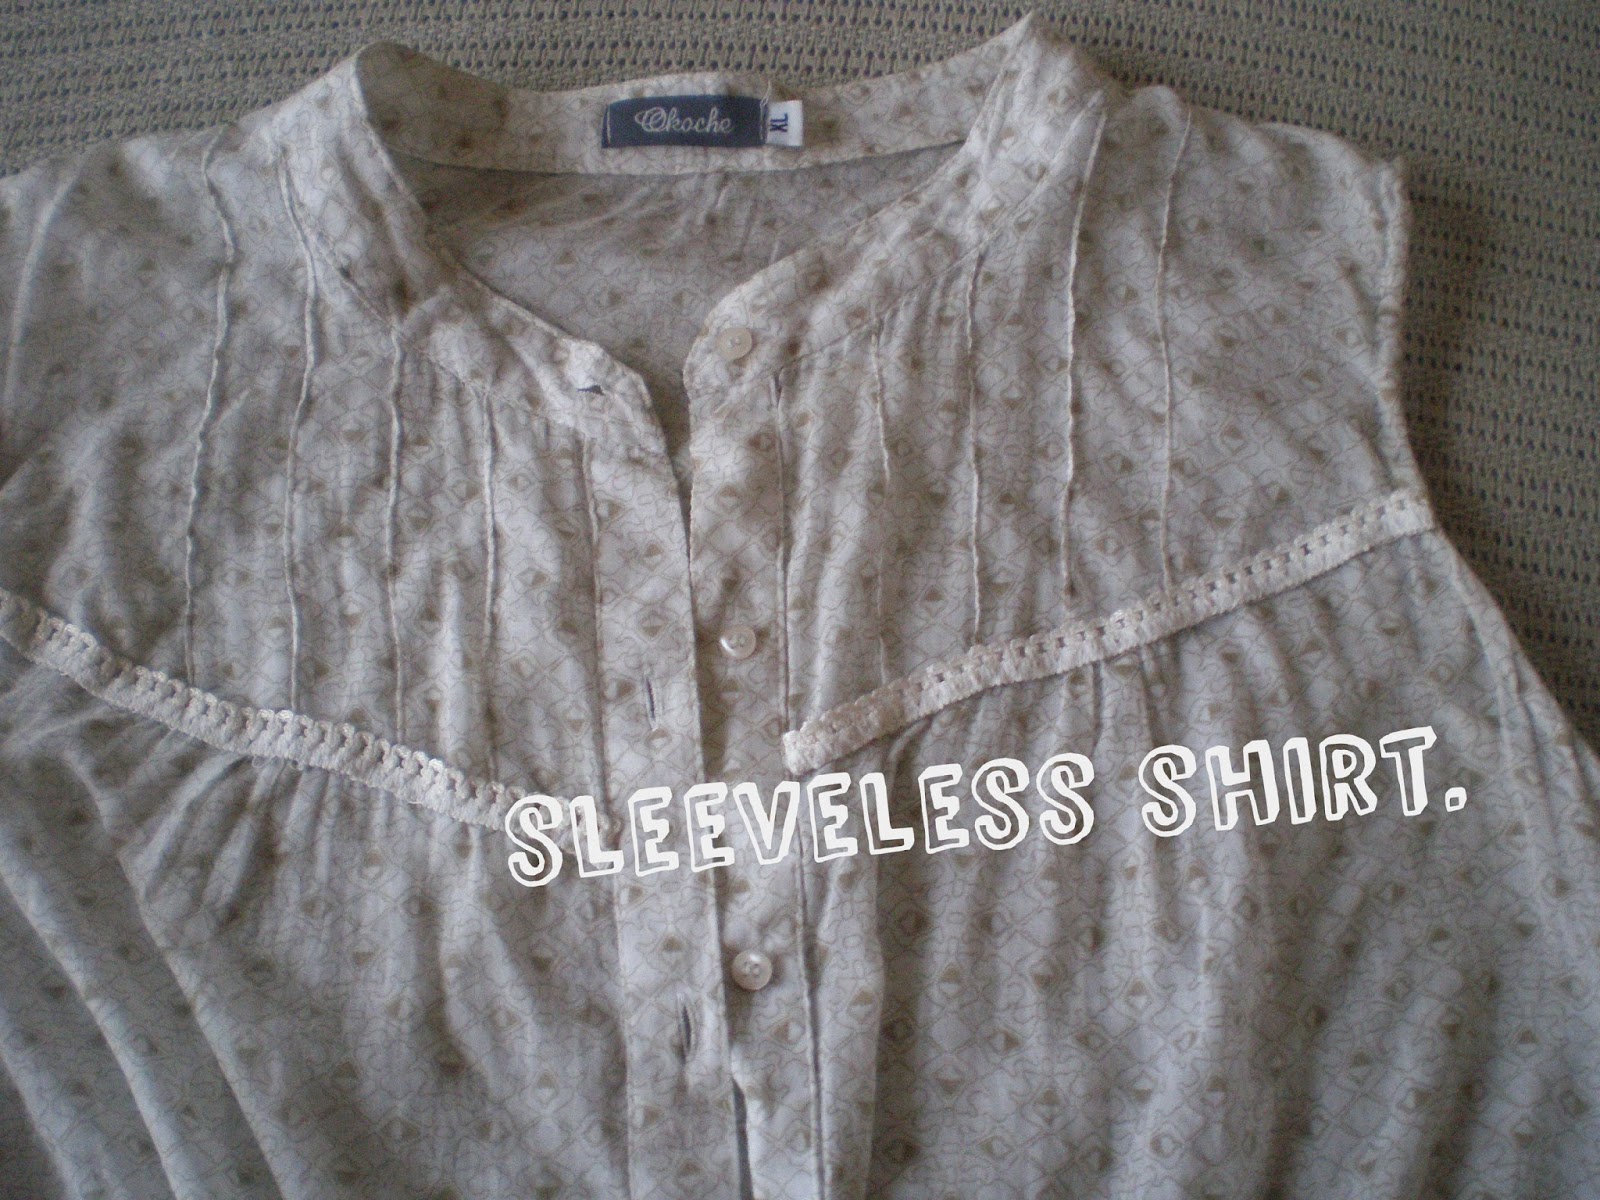
DIY RENUEVA TU CAMISA CON MANGAS UPDATE YOUR SHIRT


Renueva tu camisa!!
mucho tiempo, sin un DIY fácil y práctico.


 1-aplanar las mangas simétricamente
2-cortar dejando un margen de costura de 2 cms
3-enrollar en si misma, la tela, y coser del revés, con puntadas invisibles.
Listo!! ya tienes tu camisa sin mangas, ahora decórala a tu Gusto!!
4-agregar detalles de cintas o puntillas con algunas puntadas.


Update your shirt 
long time without easy and practical DIY. 
1-flatten the sleeves symmetrically 
2-cut leaving a seam allowance of 2cm 
3-roll itself, the fabric, and sew inside out, with invisible stitches 

4-add ribbons or lace detail with a few stitches.


DIY CAJA PARA JUGUETES WOOD DRAWER FOR TOYS

Conseguí esta caja de frutas, de madera, y se me ocurrió que arreglándola un poco, vendría muy bien para los juguetes de mi hija.
los pasos son simples:
1-lijar con lijas para madera 180-220 (grosor del grano)
2-limpiar el polvillo.
3-aplicar masilla para madera en las imperfecciones o enduído de pared, en las maderas que sean muy ásperas.
4-pintar con pintura al agua (látex) o la que prefieras.
5-para la decoración de flores, recorté una servilleta de flores y le quité las capas de papel que trae detrás, coloqué pegamento en la madera y ,  muy lentamente, pegué la estampa.
6-dejar secar, lijar para dar un acabado viejo, colocar pátinas, y un barniz protector.
7-en la base, coloqué paño lenci (felpa) para que no lastime al piso.
8-tambien puedes colcarle un cordón para que los niños lleven a pasear a sus muñecos.


 Get this box of fruit, wood, and it occurred to me that fixing it a little, would come in handy for my daughter's toys.
the steps are simple:

1-sanded with 180-220 sandpaper wood (grain thickness)
2-clean the dust.
3--applied wood putty or spackling imperfections for walls, on the woods that are very rough.
4-painted with water based paint (latex) or you prefer.
5-the flowers for the  decoration: cut out a napkin with a lovely disegn .and removed the layers of paper that brings back,  put glue on the wood and, very slowly, hit the print.
6-let dry, sanded to give an old finish, placing patinas, and a protective varnish.
7 at the base, placed lenci cloth (plush) for not hurt the floor.
8-put cord , so the children ,can take a ride with  their dolls.


DIY ADORNOS NAVIDEÑOS CON PAPEL Y CARTÓN DIY CHRISTMAS DECORATIONS WITH PAPER AND PAPERBOARD

Tan sencillo como:


1-marcar en el cartón el molde, recortar.
2-cortar el papel un poco mas grande que el molde, y realizar unos cortes para poder pegarlos.
3-coloca otro papel para tapar la otra cara del colgante.
4-agujerea  y coloca un cordón para colgar.
5-decora con brillos, palabras, papeles,perlas,telas o papeles colocados como tejas. 


As simple as:

1-dial in the mold cardboard cut out.
2-cut paper slightly larger than the mold, and make cuts to paste.
3-places another paper to cover the other side of the pendant.
4-bore and put a cord for hanging.

5-decorate with glitter, words, paper, beads, cloth or papers placed as tiles.


DIY PORTA BIJOUTERIE DIY BIJOUX HOLDER

Estás lista para organizar tus pendientes? Sólo necesitas un cuadro que ya no uses, o un marco de cuadro. Vamos, comencemos...!!
Let Get Started!!all you need is a picture frame.


1-desarmar el marco
2-cortar una tela , tipo paño lenci ,o felpa
3-colocar la tela entre el marco y la imagen del cuadro.
4-cortar las esquinas, en diagonal
5-colocar adhesivo y pegar la tela.
6-colocar, por detrás del marco, un recorte de tela para tapar y que se vea mejor.
7-colocar, si fuera necesario, un gancho para colgar.

1-disassembling the frame
2-cut fabric, cloth type lenci, or felt
3-place fabric between the frame and the image of the frame.
4-cut corners, diagonally
5-place adhesive and glue the fabric.
6-place, behind the frame, a cut of cloth to cover and make it look better.
7-position, if necessary, a hook for hanging.


DIY TEÑIR EN FRÍO-CAMBIANDO EL COLOR A UNA CAMISA CON ANILINA COLD DYE, DYEING WITH ANILINE

Teñir es tan fácil como divertido! te lo recomiendo antes de darte por vencida con alguna prenda que ya no le tengas mas esperanzas...
Antes de teñir:
  • Asegurate de que la anilina tiña el tipo de tejido que sea, rayón , algodón, seda.
  • hay telas que no se pueden teñir con anilina, las prendas o hilos de una prenda, que sean de poliéster, no se teñirán.
  • recuerda usar guantes de látex para no mancharte.
  • las cucharas o elementos que uses, los debes limpiar con lejía, lavandina o cloro, según la llames en tu país.
  • la sal, fija los colores, por lo tanto, debe estar totalmente disuelta, si hay granitos de sal, disuélvelos!
  • el vinagre, en el enjuague final, ayuda a fijar el color.
  • recuerda que si tiñes varias prendas al mismo tiempo, quedarán diferentes tonos del color.
  • siempre, lee las instrucciones del envase, ya que cada fabricante puede tener indicaciones diversas.


Dye is so easy and fun! I recommend before you give up on a garment that no longer have more hope ...
Before dyeing:
  • Make sure the aniline dye your type of fabric is, rayon, cotton, silk.
  • some fabrics which are not dyeable with aniline, clothing or a garment yarns which are polyester, are not stained.
  • remember to wear latex gloves to not get dirty.
  • spoons or items you use, you should clean the bleach, bleach or chlorine, as you call it in your country.
  • salt, fixed colors, therefore, must be completely dissolved, if grains of salt, dissolve them!
  • vinegar in the final rinse, helps set the color.
  • remember that if you dye several items at the same time will be different shades of color.
  • always read the instructions on the package, as each manufacturer may have different indications.

1-lavar la prenda, y mojarla.
2-colocar agua en un recipiente, y añadirle sal, 1 cucharada por litro de agua, disolver.
3-disolver el pigmento en agua hirviendo, y vocarlo en el agua con sal.
4-colocar la prenda y remover sin parar, para evitar una coloracion despareja
5-remover cada 5 minutos, durante 1 hora.
6-pasado el tiempo, enjuagar el resto del color y dejar secar a la sombra.
7-lavar la prenda, preferentemente con prendas de colores similares, ya que puede manchar otras prendas.


1-wash the garment, and wet it.
2-put water in a bowl, and add salt, 1 tablespoon per liter of water, dissolve.
3-dissolving the pigment in boiling water, and vocarlo in salted water.
4-place the garment and stir continuously to avoid uneven coloring
5-remover every 5 minutes for 1 hour.
Six-over time, rinse the rest of the color and let it dry in the shade.
7-wash the garment, preferably with like colors, as it can stain other garments.

Related Posts Plugin for WordPress, Blogger...